05 Feb How to Easily Change Wifi on Google Home: Foolproof Guide!
To change the WiFi on Google Home, open the Google Home app, go to settings, select the device, and click on Wi-Fi. Now, you can connect it to a new network.
Google Home is a smart speaker and voice-controlled assistant with a stable Wi-Fi connection to function properly. However, there may be times when you need to change the Wi-Fi network associated with your Google Home device. This could be due to a change in your home network or moving the device to a new location with a different Wi-Fi network.
We will guide you through the simple steps to change the Wi-Fi on your Google Home. Following these instructions, you can quickly reconnect your Google Home to a new Wi-Fi network and enjoy its convenient features and capabilities. Let’s explore the process of changing the Wi-Fi on Google Home.
The Importance Of Having A Secure Wifi Connection

When it comes to setting up your Google Home device, one of the primary steps is connecting it to your home’s Wifi network, just as you would ensure a secure connection for a device like https://thekindle3books.com/. However, it is crucial to understand the significance of having a secure Wifi connection for your Google Home. The security of your Wifi network directly affects the privacy and access controls for your device, ensuring data privacy and preventing unauthorized access.
Ensuring Data Privacy And Security
Having a secure Wi-Fi connection safeguards your personal and sensitive information from potential threats. Connecting your Google Home to a secure network creates a barrier against unauthorized individuals attempting to intercept and access your data.
Preventing Unauthorized Access
A secure Wifi network prevents unwanted access to your Google Home device. An encrypted connection prevents unauthorized individuals from gaining control or manipulating your device settings. This ensures that only you and the authorized users have control over the functionalities of your Google Home.
Understanding The Connection Process
Changing the WiFi on your Google Home device can seem daunting, especially if you’re considering a factory reset, but with the right guidance, it can be a quick and easy process. This section will walk you through the steps of preparing your Google Home device and accessing the WiFi settings, ensuring a smooth transition to a new network.
Preparing Your Google Home Device
Before you begin changing the WiFi on your Google Home, there are a few things you need to do to ensure a successful connection process. Follow these steps:
- Ensure that your Google Home device is plugged in and powered on. A stable power supply is crucial for the setup process to work smoothly.
- Ensure your mobile device or computer is connected to the WiFi network you want to change to. This will make accessing the necessary settings easier and complete the process.
- Keep the Google Home device near your WiFi router or modem. This will strengthen the signal and help prevent interference during the setup process.
Accessing The Wifi Settings
Once you have prepared your Google Home device, you can proceed to change the WiFi network it is connected to. Follow these steps:
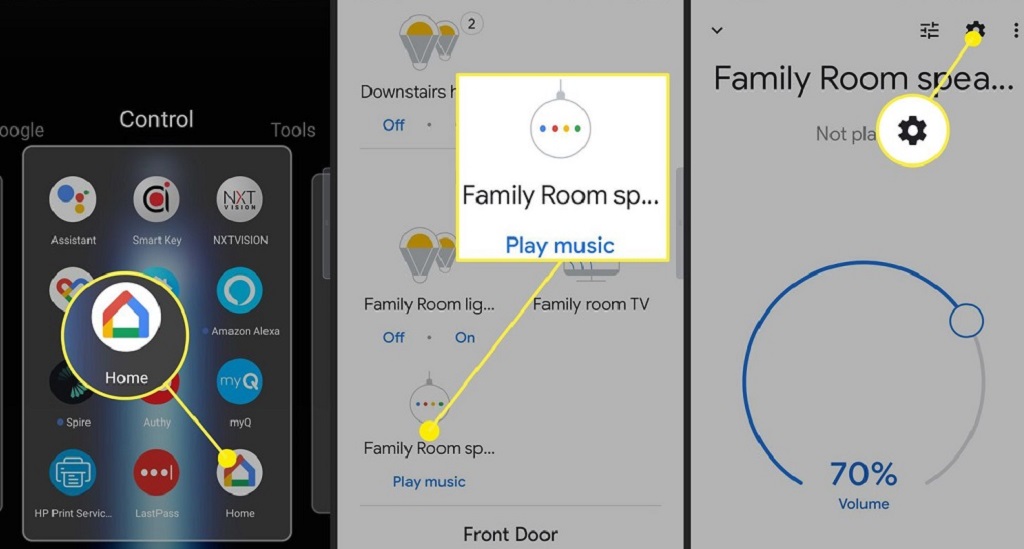
- Open the Google Home app on your mobile device or computer. Ensure you have the latest app version installed for optimal performance.
- You can change the WiFi for the Google Home device by tapping on the device icon in the app.
- Tap the settings icon at the top right corner of the device screen to open the device settings menu.
- Scroll down and tap on the “Wi-Fi” option. It may be listed as “Network & general” on some devices.
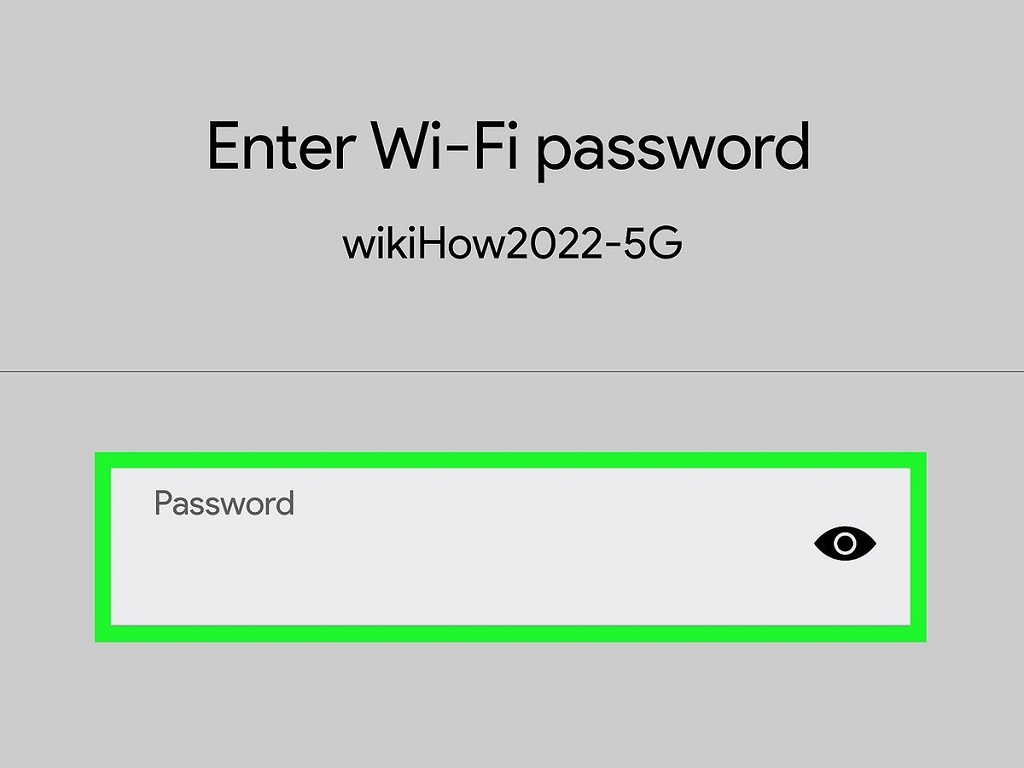
- You will now be presented with a list of available WiFi networks. Select the network you want to connect your Google Home device to.
- When prompted, enter the password for the selected WiFi network. Double-check that the password is correct, as any typos may result in a failed connection attempt.
- After entering the password, your Google Home device will attempt to connect to the new WiFi network. This may take a few moments.
- Once the connection is established, you will receive a confirmation message on the Google Home app. Your Google Home device is now successfully connected to the new WiFi network.
Step-by-step Guide To Changing Wi-Fi on Google Home
Welcome to our step-by-step guide on how to change the Wifi on your Google Home device. Whether you’ve moved to a new location or need to connect to a different network, this simple process will have you up and running in no time. Below, we’ve outlined the three key steps you’ll need to follow to complete this task seamlessly.
Step 1: Accessing The Google Home App
Locate and launch the Google Home app on your smartphone or tablet. If you haven’t installed the app, it’s available for download on both the App Store and Google Play Store.
Step 2: Navigating To Device Settings
Once the app opens, tap on the device you wish to update. This will take you to the device settings page, where you can adjust your Google Home settings.
Step 3: Connecting To A New Wifi Network
Next, select “Wifi” from the device settings menu. You will then be prompted to enter the password for your new Wi-Fi network. Once you enter it, your Google Home device will seamlessly connect to the new Wi-Fi network, allowing you to resume using it as usual.
Common Troubleshooting Tips
Changing your Google Home device’s Wi-Fi may seem daunting, but don’t worry! We’ve covered you with these common troubleshooting tips to help you breeze through the process. Whether you’re encountering compatibility issues with your router or need to reset your Google Home device, follow the steps below to get your Wi-Fi connection up and running smoothly.
Checking Router Compatibility
Before attempting to change the Wi-Fi on your Google Home device, it’s crucial to ensure that your router is compatible. Here’s how you can quickly check:
- Ensure your router supports a 2.4 GHz Wi-Fi network, as Google Home devices don’t currently support 5 GHz networks. If your router only operates on a 5 GHz network, you may need to consider using a different router or connecting your Google Home device to a different network.
- Verify that your router is turned on and functioning properly. Sometimes, a simple router reboot can resolve connectivity issues.
- Check for any firmware updates on your router’s manufacturer’s website. Updating your router’s firmware can often improve compatibility with Google Home devices.
Resetting Google Home Device
If you’re still experiencing Wi-Fi connection problems after checking router compatibility, resetting your Google Home device might be time. Before resetting, keep these points in mind:
- Resetting your Google Home device will erase all previous associated settings and connections.
- Make sure your Google Home device is plugged in and powered on before proceeding with the reset process.
To reset your Google Home device, follow these steps:
- Locate the microphone mute switch on the back of your Google Home device and ensure it is in the mute position.
- Press and hold the microphone mute switch for about 15 seconds until the LED lights on the top of the device illuminate.
- Once the lights turn off and back on again, it indicates that the device has been reset successfully.
- Open the Google Home app on your smartphone and follow the prompts to set up a new Wi-Fi connection for your device.
By following these troubleshooting tips, you should be able to change the Wi-Fi on your Google Home device without any hassle. Remember to double-check your router compatibility and follow the correct steps for resetting your device if needed. Now, enjoy a seamless Wi-Fi connection and maximize your Google Home experience!
Ensuring Smooth Transition To New Wifi Network
Changing the Wifi network on your Google Home device can sometimes be intimidating, but with the right steps, you can ensure a smooth transition to your new network. This guide will walk you through the process and provide helpful tips to verify connectivity and test device functionality. Let’s get started!
Verifying Connectivity
Before you begin changing the Wifi network on your Google Home, it’s crucial to ensure that you have a stable internet connection. Follow these simple steps to verify your connectivity:
- Make sure your smartphone or tablet is connected to your current Wifi network.
- Open the Google Home app and tap on the device you want to change the network for.
- Tap on the Settings icon and select ‘Wifi’ from the list.
- If the Wifi network name is grayed out, your Google Home device is not connected to the internet. In this case, restart your router and try again.
- If the network name is not grayed out, it indicates a successful connection. You’re now ready to change the Wi-Fi network.
Testing Device Functionality
After verifying connectivity, it’s important to test the functionality of your Google Home device on the new Wifi network. Here’s what you need to do:
- Connect your smartphone or tablet to the new Wifi network.
- Open the Google Home app and tap on the device.
- Ensure the device shows as ‘Connected’ under the Settings icon and ‘Wifi.’
- Try asking Google Home a simple question or command to test its response time and accuracy.
- If the device responds correctly, it means everything is working fine. However, if there are any issues, try restarting your Google Home device and the router.
By following these steps and ensuring both the connectivity and functionality of your Google Home device on the new Wifi network, you can ensure a seamless transition without any disruptions. Happy connecting!
Frequently Asked Questions Of How To Change Wifi On Google Home
How Do I Change The Wifi Network On My Google Home?
To change the WiFi network on your Google Home, open the Google Home app on your mobile device. Tap on the device you want to update. Go to Device settings, then Wi-Fi network. Follow the on-screen instructions to connect your Google Home to a new WiFi network.
Can I Change The Wifi On Google Home Without The App?
No, you cannot change the WiFi network on your Google Home without the app. The Google Home app is necessary to access the device settings and change the WiFi network. Ensure you install the app on your mobile device before changing the WiFi on Google Home.
What Should I Do If My Google Home Won’t Connect To Wifi?
If your Google Home won’t connect to WiFi, try the following troubleshooting steps:
Make sure your WiFi network is functioning properly. Restart your Google Home device and router. Check if your Google Home is within range of the WiFi signal. Reset your Google Home to factory settings and set it up again.
How Can I Improve The Wifi Signal For My Google Home?
To improve the WiFi signal for your Google Home, try the following tips:
– Move your router closer to your Google Home. – Avoid placing the Google Home on metal surfaces or near other electronic devices. – Reduce WiFi interference by changing the channel on your router. – Consider using a WiFi extender or mesh system to expand coverage. – Update your router’s firmware for better compatibility with Google Home.
Conclusion
Changing the Wi-Fi on your Google Home is simple and quick. By following the steps outlined in this guide, you can ensure that your device stays connected to the internet and continues to function smoothly. Explore the comprehensive guide on ‘Which Wi-Fi Mode is Best?‘ to make informed choices for seamless connectivity. With these tips, you can now stay connected without any hassle.
No Comments